Showing posts with label Crafts. Show all posts

Thursday, January 31, 2013

Paper Bag Skirt


 I love skirts!!  They can be paired with a cute pair of sandals, leggings, or boots.  I want to make some skirts for myself, but I am nervous to venture into the world of sewing adult-sized clothing.  I have seen these paper bag skirt tutorials all over the blogosphere and really want to make one for myself.  But first, I decided to make one for Abby.  I can work out the kinks and have a better understanding of the pattern.  And if I mess up, it is less material to throw away!!  So I found this tutorial at Sew Caroline and adjusted it for Abby.

Since Abby was at school, I used one of her other skirts as a guide.  In general, add four inches to the desired length of a finished skirt.  For the width, measure around the largest part of your bottom, divide by two and add 2 inches.  Abby's little skirt ended up being 16" in width and 19" in length.  Cut out two squares this size. 


I pressed my two squares and then pinned right sides together.  Sew two side seams.


Once side seams are sown, turn down three inches from the top and press.  Run a stitch ALMOST all the way around the skirt.  Leave a small opening to run your elastic through.  Then measure about 1.5" closer to the top of the skirt and run a stitch all the way around the skirt.  This will be the casing for the elastic.  (My elastic was 1 inch wide opening was about 1.5".  Adjust sizes for the size of the elastic.)


Place a safety pin on one end of the elastic and feed it through the opening.  Work the elastic all the way through the opening.  Be careful not to twist the elastic.  Sew the two ends of the elastic together using a zigzag stitch (do NOT twist the elastic during this step.)


Complete the skirt by adding a seam at the bottom of the skirt.


I decided to make a sash to go with the skirt.  I cut a strip of  material 3" wide (for a 1 1/2" wide sash) and 50 inches long.  (I multiplied the waist measurement by 3 and added two inches.  However, I wish I had added 5 -7 inches.)  I folded the strip in half (folding right sides in) and pressed a crease.  I also cut the ends at an angle. 


So up until this point, I had been working on the skirt for about 30-35 minutes (that is with a 4 year old and an 11 month old who needed a bottle.)  But when it came time to turn this sash right-side out, it took almost as much time!!  I started with a wooden spoon, but that didn't work too well.  So I had to just had to ever-so-slowly pull the right side out.  I later discovered that attaching a safety pin and feeding it through the tube would have been the way to go!!


Once the entire sash is right-side out, close the other end of the sash with a straight stitch, turning the raw edges under.  I also pressed the sash down flat.  I also thought about attaching the sash to the skirt with a simple stitch, but have neglected to do so.


Abby liked posing for the pictures.  To bad she has Hello Kitty bandaids on her legs and I took pictures in front of a light switch!!

I also had a little helper during this project.  Micah was the official "Pin Putter Upper".  He took his job VERY seriously!!


Rachel

Wednesday, December 19, 2012

Mod-podge Clipbaords


Ah....clipboards!!!  As a teacher, I used them for several different things in the classroom.  But they are generally so, well, blah!!  That is, until, one of my favorite (I know a teacher isn't supposed to have favorites, but this girl was special) students, Elise, gave me a fancy clipboard.  She had glued some cute scrapbook paper to the front of the clipboard, tied a ribbon to the top, and had a sticker with my initial.  Really cute!!  Although I don't teach anymore, I still use that clipboard on a  regular basis.  I decided to give Abby's teachers the same gifts for Christmas.  I hope they will get as much use out of the clipboard as I did.


I purchased a pack of wooden clipboards (package of 3), scrapbook paper, mod-podge, letter stickers, and ribbon (not pictured.).

The hardest part of this project is measuring the paper.  There are two methods.  You can trace the clipboard outline and then trim off the excess once it has dried (generally the edges are filed for a smooth finish) or you can cut the paper slightly smaller then the clipboard and attach paperK.  This will leave the edges of the clipboard exposed.  If that bothers you, simply paint the clipboard first,allow to dry,and then attach paper.  I chose the second method, but didn't paint the clipboard first.


I also made sure the corners were rounded like the clipboard.


Once the paper was measured and cut, I applied a layer of mod-podge to the clipboard using a foam brush.  I discovered that too much of the mod-podge was better than not enough.  The excess can always be wiped away.


As soon as the paper is applied to the clipboard, smooth it out.  Although I could have used my hands, using another clipboard was ideal.


Allow it to dry for 15 minutes, then apply a thin layer of mod-podge over the top of the paper.  Allow to dry another 15 minutes and apply a second coat.  Once the second coat has completely dried, add the letter sticker and tie the ribbon on the top.   If bubbles show up during this part, don't panic, they will go away.

 I forgot to take a picture with the ribbon at the top, but I simply cut 6-7" inch strips and double tied the at the top around the hole.  It turned out really cute.


One thing that I discovered, if I used thicker scrapbook paper ( similar to card stock thickness),  it was much easier to smooth out and no bubbles appeared at all.

Simple, useful craft that is easy to make.  Happy crafting!!

Tuesday, December 18, 2012

Button Bracelets


A few years ago, I was attending a craft fair and saw a booth selling some button bracelets.  I immediately loved them and snatched up two, one black and one cream.  I knew that these bracelets would be simple to make, but I hadn't taken the time to sit down and actually complete the project.  With Christmas around the corner, I decided to make a couple of these for gifts.  It was an inexpensive project, easy to complete, but super cute.

I purchased some black elastic that was 3/4" but 1" would also work well, if not better.  The buttons were already selected and sold together in coordinating browns.  You could also hand select buttons, but this was the cheaper route.  I also chose to use black thread.

I used my own wrist as a guide to measure the bracelet size, but this project allows you to easily adjust for any size wrist.  I overlapped the ends and sewed them together and then start sewing on buttons.  Pack them on the elastic.  Also, you can stack a couple of buttons together.  You can choose to sew the buttons on in a pattern with similar sized buttons or use all sizes, colors, and sew them on randomly.  (That was my method!)  One thing I would have done differently...USE A THIMBLE!!  My fingers were sore from pushing the needle through those button holes!!  I forgot to take pictures throughout the process, but here are a couple of the end product. 


Rachel

J-O-Y Door Decor


In September, I made a post titled F-A-L-L Door Decoration.  It was a fun and simple craft to dress up a door for fall.  I decided to continue the craft, but geared the words more towards Christmas.  I made a J-O-Y door decoration.  I simply painted the letters white and used a red ribbon with white polka dots.  I also used smaller letters for this particular project because I liked the curly letters.  Since the letters were smaller, I also used a thinner ribbon.

This project could be completed for a variety of seasons.  Other words that could be used to decorate the door include: SNOW, NOEL, SPRING, EASTER, LOVE.  The letters can be simply painted or decorated using scrapbook paper and Mod-Podge.  (I know how this stuff works now:)  )  Lots of possibilities!!  Step-by-step instructions for this project can be found here.  Happy Crafting!!
Rachel

Saturday, December 8, 2012

Pottery Barn NOEL Knock-off


Pottery Barn...sigh!!  I love almost everything in the store.  It is my style in home decor.  But you know what I don't love...the prices.  As a result, I simply window shop and use it as my muse for some homemade knock-offs.

For the holiday season, I ran across this Pottery Barn wall hanging.

 
 Super cute, with a super price tag of $149.  No, your eyes do not deceive you.  Those four letters cost $149.  So I decided to make my own.

Supplies:
N O E L--mdf letters
Crimson and raw Umber Paint
Paint brushes
Glue Gun and Glue Sticks


I painted all the letters in the Raw Umber first.  It doesn't have to be perfect.  In fact, if some white shows through or if the brush strokes are visible, that's okay.  It will add to the rustic look of the piece.


When the paint is almost dry, add a layer of crimson.  Once again, don't paint it solid.  Some of the umber needs to show through.  Keep layering the paints in this manner until you like it.


 Can you tell where I have been painting?


Once the letters have completely dried, arrange them to say NOEL.  You can be creative with the arrangement. 


Use hot glue to attach letters together.  I also used a staple gun to secure the letters more.


I spent a total of $13 to get the same look as the $149 original!!  Have a Merry Christmas and happy crafting!!


Wednesday, November 14, 2012

Almost Homemade Crayons


Winter is quickly approaching and I anticipate several snow days.  When I was teaching, I would often times go to school to work on a snow day...it is amazing what you can accomplish when students aren't there.:)  But this year I won't be going to school and I will have THREE kids to keep entertained for what may be a LONG winter.  Fun, indoor activities will be a must for our household---paints, play-doh, board games, arts and crafts.  Abby was out of school on Monday for Veterans Day and it was very cold and rainy---almost like a trial run for the winter.  So.....we decided to make homemade crayons...well, almost homemade!!!

  
1.  Simply peel the paper off of old and broken crayons.  (It helps if they are all the same brand.)  We discovered that cutting the paper with an exacto knife helped with the removal of the paper.)

2.  Line a cookie sheet or baking pan with aluminum foil and sprayed it with cooking spray.  You can also use a mini muffin pan.  You can group crayons by like colors or randomly.

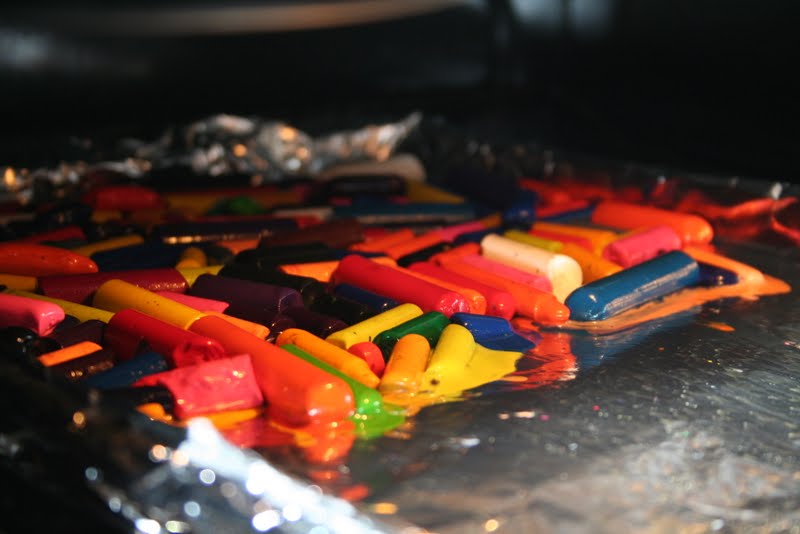
3.  Place the the crayons on the pan.

4.  Place crayons in a 300 degree oven and bake for 8-9 minutes.
Waiting, waiting, waiting.....

5.  Remove from oven.  Allow to cool for approximately 10 minutes.

6.  When the wax is still pliable, use cookie cutters to cut out random shapes or remove from the muffin pan.  


7.  Allow to cool completely before using.

8.  Have fun coloring!!
 

 All of the kids' names were written with the same crayon!!!

Things I may have done differently:
1.  Used small cookie cutters.  The crayons are less likely to break.
2.  Use a smaller pan so the crayons are thicker.
3.  I used regular sized crayons and the large size (for young kids).  They did not melt at the same time.

Rachel